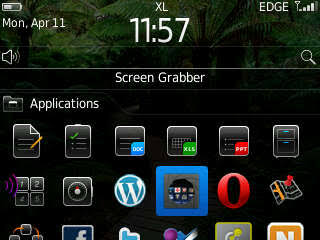
Remember "Screen grabber" - a reliable application we use those days for screenshots on our then Smartphones (Blackberry 4, 5, 6, 7 devices - Storm series, Tour series, Pearl series, Curve series, Bold series, Touch series and Porsche series), before the advent of Android and Blackberry 10 operating systems?

Yes, blackberry was somewhat for the rich then (considerably expensive), and many may not have been opportune to use them and tell the huge differences now.
Well, the application prevalent in blackberry app world for screenshots then was "Screen grabber", and I must say, it worked worthwhile.
This application saved many the stress, from having to go back to whatever documents or information they need saved, while browsing, chatting and the likes, and saves those documents or information as a screenshot, in a photo-like form.
That being said, it is note worthy that the necessity for screenshots then and now, cannot be displaced. Even our gadget manufacturers saw it necessary and incorporated this feature in some hidden manner.
Did you know that you can take screenshots on whatever platform you use, more importantly on your laptop (be it windows, Mac or Chrome)? I'm sure I got you asking "how possible is that?". Yes, you can!
All operating systems have built-in methods of capturing a screen.However, we will touch on the laptops platform today and we will show you some of the tools that make it simple to take an image within the Web browser.
Taking a Screenshot on PCs:
This seems somewhat complicated, but nothing insurmountable.
Windows -
The better way to take a screenshot in Windows is to use the Alt-PrtSc (Alt+printScreen) button. You'll find PrtSc on the upper right side of most keyboards and Alt on the right down side on your keyboard, directly beside the Space-bar.
Open a window, make it the focus of attention, and then tap Alt-PrtScn. It will appear like nothing has happened, but it has in fact taken a screen grab of just that window and copied it to the clipboard.
You can then hit Ctrl-V to paste it into a program, be it a Word document or an image editing program.
There's also a built-in helper, "Snipping Tool". This has been around since the days of Windows Vista, so you may have to search to find it. Once launched, it provides a tiny window with menus that make it easy to capture multiple types of screenshots. Grab just the area you want (in a rectangle or draw free-form), a select window, or the whole screen. The image you captured will be shown instantly, so you can choose what to do with it: save it, copy it, email it, or highlight sections of it. It's an old program, and not up-to-date enough to offer sharing via social networks.
Another is "Snagit", though this is not free, but it will do it everything you can imagine, including a video take of what's happening on your screen (that's called a "screencast"). It goes for $50.
You can find plenty of screenshot apps for free, though. Jing , by the makers of Snagit, also does screencast videos and makes sharing what you capture easy.
LightShot is a nifty and small utility that takes over the PrtScrn key and makes it easy to capture and share. Both are also available for Mac.
Mac OS -
To capture the entire screen, tap Command+Shift+3 (all three keys at once). A PNG image file of the screen will appear on your desktop. If you only want part of the screen, tap Command+Shift+4 ; it turns the cursor into a crosshair. Select the section of the screen you want to capture. Or, press the space bar, and the cursor turns to a camera—click on any open window to highlight it. Click again and just the window itself is captured.
If you like the Windows method—where what you capture is saved to the clipboard instantly—just try
Command+Control+Shift+3 for the whole screen or Command+Control+Shift+4 for a section. Adding the Control key to the keystroke ensures the image isn't saved to your desktop, then use Ctrol+V to paste it into any app.
Note: For users of Mac with Retina display, a screenshot of the entire screen can be huge in PNG format, as big as 7MB. However, you can save in JPG or some other format, by changing the settings. To do so, you will need to open a terminal window on the Mac. You will see "com.apple.screencapture", then type "JPG". If you're asked for your password, enter it. Restart your system and future screenshots should be in JPG format. Change it back by typing the same, but replace "JPG" with "PNG."
There's also a built-in helper, "Grab". To access this, go to Applications > Utilities folders (search with Spotlight to find it quickly). Grab only captures images in TIFF format, but it can take a shot of the whole screen, a window, or a selected section, and it has a timer so you can capture items like drop-down menus. The shortcuts to do so are the same as you would use for the OS itself.
Another is a free app, "Snappy", which can sync screenshots with the SnappyApp for iOS, Jing , Snagit, Skitch ,
LightShot, and others.
Chromebook-
For users of a Chromebook running ChromeOS, press the Ctrl and Windows Switcher Key in the top row –it's the one that looks like a stack of windows layered on top of each other, or box with some lines next to it—simultaneously. That'll take a full-screen image. You'll see the notification on the lower right of the screen.
To get just a section of the screen, press Ctrl+Shift+Window Switcher. The cursor becomes cross-hairs you can use to select what you want an image of.
If you're using a standard keyboard—not a Chromebook keyboard, thereby lacking the Window Switcher button, you will press the Ctrl+F5 instead.
All the images are saved as PNG files and get stuck in your Downloads folder.
Now that you know, put it to use and you can get back to us on the results.
Comments
Post a Comment